DIY Scarecrow Wood Sign + Snowman
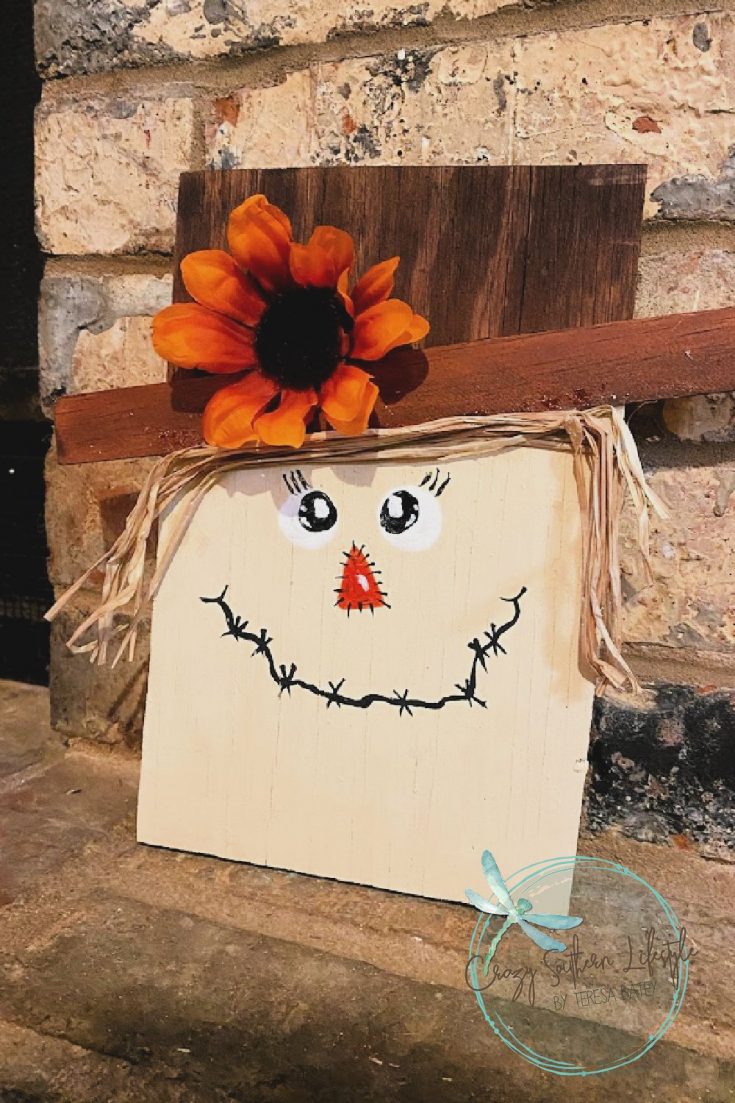
My favorite time of year to craft, Fall and then Winter. I have been making so many things but this DIY Scarecrow Wood Sign was one of my favorites.
I had practically everything on hand to make them both and I am loving them.
If you would like a printable version of these instructions, please scroll all the way to the bottom of this post.

Supplies - DIY Scarecrow Wood Sign
Just know that you can get all these materials at your local Dollar Tree. For the wood piece, just grab an already made sign from the seasonal department and just paint over it.
- Wood
- Paint Stick
- Wood Stain
- Chalk Paint
- Acrylic Paint
- E6000 Glue (or Hot Glue)
- Fake Floral
- Natural Raffia
- Paint Brushes
Instructions - DIY Scarecrow Wood Sign
- Take your paint stick and cut it where it starts to curve, that way you will just have a straight peace of thin wood.
- Using your E6000 or hot glue, glue the paint stick onto your piece of wood, make sure to angle it.

- Use wood stain (or brown paint) and paint the top part of the wood and the paint stick (to for a hat).
- Use the white chalk paint (or acrylic paint) and paint the rest of the wood.

- Once everything is dry, you can now grab your paints and paint brush and paint on a face.
- Take a fake flower and glue it onto the hat.

- Take some raffia and cut it to the length you want and start gluing it underneath the hat area to form hair (or leave off if you wish).
While I was gluing on the raffia, I used the E6000 but I think it would have been easier to use hot glue so that it would stick better. Just an FYI!

I also made a cute little snowman.
I've seen others do it on the back side so that they can just turn it around but I much have them separate.


And here are both of the little cuties hanging out together.
These were so much fun. It's amazing all of the things that you can create out of a piece of wood.

If you loved this Fall DIY as much as me, please scroll down and share this with your friends. If you make one, stop by and share your creation with us over on my Facebook page or on Pinterest.
xoxo,

DIY Scarecrow Wood Sign
This was a fun little scarecrow project and can be done anyway you wish. All of the supplies can totally be purchased at your local Dollar Tree but for the wood, you can get an already made sign and paint over it.
Materials
- 1. Wood
- 2. Paint Stick
- 3. Wood Stain
- 4. Chalk Paint
- 5. Acrylic Paint
- 6. E6000 Glue (or Hot Glue)
- 7. Fake Floral
- 8. Natural Raffia
- 9 Paint Brushes
Instructions
- Take your paint stick and cut it where it starts to curve, that way you will just have a straight peach of thin wood.
- Using your E6000 or hot glue, glue it onto your piece of wood, make sure to angle it.
- Use wood stain (or brown paint) and paint the top part of the wood and the paint stick (to for a hat)
- Use off white chalk paint (or acrylic paint) and paint the rest of the wood.
- Once everything is dry, you can now grab your paints and paint brush and paint on a face.
- Take a fake flower and glue it onto the hat.
- Take some raffia and cut it to the length you want and start gluing it underneath the hat area to form hair (or leave off if you wish).
PIN this graphic below for later




I’m trying to find crafts for my friend who has dementia. She could go this with my supervision
Yes, I do agree. So simple to make