DIY Dollar Tree Splatter Screen Pumpkin
It was awesome seeing everyone’s touch on the Dollar Tree Splatter Screen Pumpkin, the way they were decorating them. At the bottom of this post, you will see a photo of my very first one.
Do you love making your own DIY fall decor or Dollar Tree crafts? I came across a Dollar Tree DIY group on Facebook and there were so many neat crafts everyone was creating and I had to join in.
It’s time to make one of your own, It’s a cheap craft, just go to the Dollar Tree for your supplies. I got my spray paint at Walmart though.
Related: Dollar Tree Splatter Screen Snowman
Related: DIY Splatter Screen Santa
Please scroll all the way to the bottom of this post if you would like to have a printout of the instructions.
Splatter Screen Pumpkin Instructions
Here is what you need:
1. Splatter Screens, 3 of them with the long handle. You can get two of them with the knobs if you want to hang your pumpkin on the wall or door.
2. Floral wire
3. Hot Glue
4. Fall decor (artificial flowers, hay, pine cones, ect for decorating the pumpkin)
5. Spray Paint
6. Craft Rope

The first thing I did was spray pained my spatter screens with my choice of color.

To connect the pumpkins together, cut pieces of the floral wire and stick it though the screen holes and twist on the back side (you can always cut the extra wire if you get it to long)

As you can see above, handles on 2 of the splatter screens are bent so that the pumpkin can sit on the counter.


Here is another one I made (below) without the rope and I painted the handle green.

Now it’s time to decorate your Fall Pumpkin. In the photo above, you will see that the rope is glued around the pumpkin and around the top handle with hot glue. Also use the floral wire or hot glue to decorate your pumpkin as you wish.
I am about to finish up my second one and then I have to make one of my own. I am loving these Fall Splatter Screen Pumpkins.
This one below is my most recent one I just made. All the others made before have stands to set on the counter but this one, will be hung on the door.
I will be taking more rope and running it through the hole on the handle, which you can’t see because of the rope wrapped around it.
Splatter Screen Pumpkin for your front Door
To make your own to hang on the door, you will need to buy 1 splatter screen with long handle and 2 with the round handles, which will be removed.

Also check out.. How To Start Crafting On A Budget
I would love to see what your pumpkin looks like, post it in the comments below.
Have Fun!
xoxo,

Be sure to check our more Dollar Tree Crafts here!
Please PIN graphic below for later


Dollar Tree Splatter Screen Pumpkin
It’s time to make one of your own Dollar Tree Splatter Screen Pumpkin, It’s a cheap craft, just go to the Dollar Tree for your supplies. I got my spray paint at Walmart though.
Materials
- 1. Splatter Screens, 3 of them with the long handle. You can get two of them with the knobs if you want to hang your pumpkin on the wall or door.
- 2. Floral wire
- 5. Spray Paint
- 6. Craft Rope (Optional)
- 4. Fall decor (artificial flowers, hay, pine cones, ect for decorating the pumpkin)
- 3. Hot Glue
Instructions
- Spray paint the spatter screens with your choice of color
- Connect the pumpkins together, cut pieces of the floral wire and stick it though the screen holes and twist on the back side (you can always cut the extra wire if you get it to long). Make sure that two of the splatter screen handles are pointing down so that you can bend them as a stand.
- Decorate your Pumpkin and use either floral wire or hot glue to connect them to your pumpkin


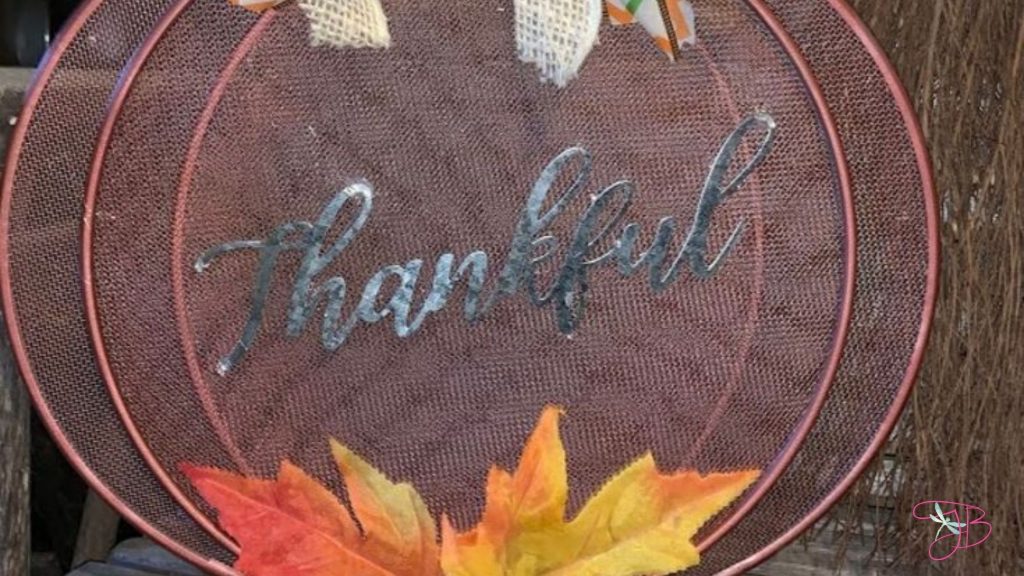
How did you put the words on your craft?
Those are metal words that come in a 3 pack (Harvest, Welcome and Thankful) from Dollar Tree. Just hot glued one on the pumpkin 🙂
This is such a cute and absolutely brilliant idea!! I was thinking it was a wreath and wondering how you cut off the handle and scrolled down to the picture with handles bent backwards to make a stand and thought that’s so simple but absolutely brilliant!! I decorate for our church events, parties, weddings, showers, and just keeping everything nice for the seasons. I am always on the lookout for cute but cheap ideas because for some events I make 30 centerpieces and also decorate serving tables and memory tables and photo taking walls. Already I can see using this idea in many ways. 2 together for a sign, decorative paper attached to make it fit any occasion,
2 intertwined wedding rings for the entrance table with names and picture of bride and groom for a wedding shower, large signs for labeling the drink urns. They are always labeled with a small sign either on top or at the spigot but no one sees them for some reason. Your brain is definitely out in left field where nothing is ever seen for what it is but for what it could be, wish mine worked that way!! Thanks so much for a great idea!!
Hi Vickie, thanks for the comment. I love those ideas that you mentioned, especially the wedding rings. I have so many ideas too, can’t wait to hear more or see yours. Thanks for stopping by.